DIY Drone Building Guide (Step‑by‑Step for Beginners)

Introduction
Dream of building your own drone instead of buying one? 🛠️ With today’s affordable parts and tons of open‑source software, you can build a working DIY quadcopter (drone) at home.
This project teaches:
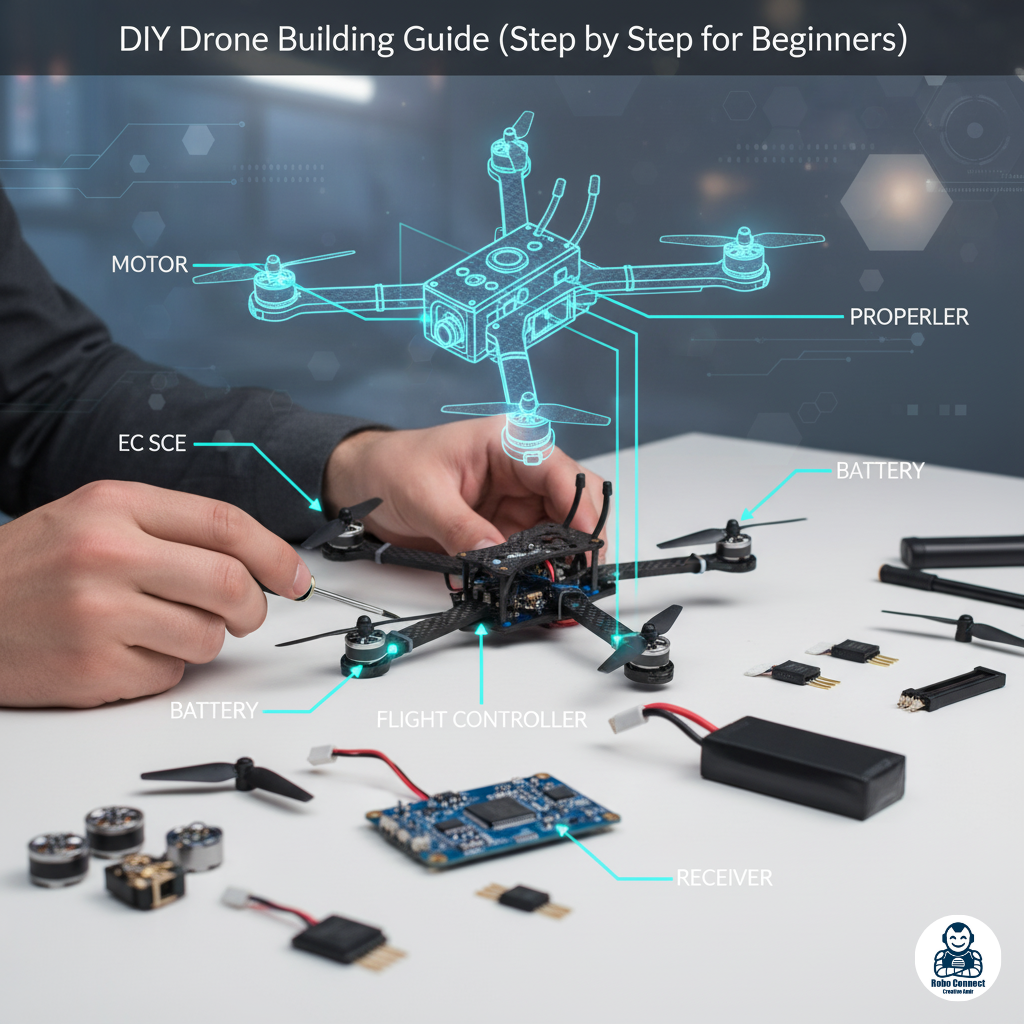
- Basics of drone components (motors, ESCs, frame, flight controller).
- How all these parts come together to achieve flight.
- A step‑by‑step walkthrough of assembly + setup.
By the end, you’ll know exactly how to build a beginner‑friendly FPV drone or camera drone.
What You’ll Need (Essential Components)
- Drone Frame
- The body that holds everything together (usually lightweight carbon fiber or plastic).
- Choose 250mm–450mm size for DIY builds.
- Motors (Brushless)
- Provide lift by spinning propellers.
- CW (clockwise) + CCW (counter‑clockwise) pairs needed.
- Typical KV ratings: 1000–2300KV (higher KV → faster RPM, less torque).
- Propellers
- Two clockwise + two counter‑clockwise.
- Sizes match motor/frame (e.g., 10″ props for 450mm frame).
- Electronic Speed Controllers (ESCs)
- Link between flight controller and motors.
- Control motor RPM (speed) as per signals.
- Example: 20A–30A ESCs for small drones.
- Flight Controller (FC)
- The “brain” of the drone.
- Examples: Arduino‑based KK2 board, Pixhawk, Betaflight F4/F7.
- Stabilizes roll, pitch, yaw using gyro/accelerometer sensors.
- Battery (Li‑Po)
- High discharge rate (30C+). Common sizes: 3S (11.1V) or 4S (14.8V).
- Needs balanced charger for safe charging.
- Radio Transmitter & Receiver
- RC controller + receiver module for wireless control (2.4GHz popular).
- Optional Add‑ons
- Camera + VTx (FPV kit) for First‑Person View.
- GPS module for autonomous navigation.
Tools Required
- Soldering iron & flux.
- Screwdrivers, zip ties, electrical tape.
- Battery charger.
Step‑by‑Step Drone Build
Step 1: Build the Frame
- Buy or 3D‑print a quadcopter frame.
- Attach motor mounts on arms.
Step 2: Mount Motors + Propellers
- Secure 4 brushless motors → arms of frame.
- Leave propellers OFF for now (add at the end for safety).
Step 3: Connect ESCs to Motors
- Solder ESCs to each motor.
- Signal wires go to the flight controller.
- Power wires → power distribution board.
Step 4: Install Flight Controller
- Place FC at center of frame (balance).
- Connect ESC signal wires.
- Flash firmware (Betaflight / Ardupilot etc.).
Step 5: Add Power System
- Connect Li‑Po battery → power distribution board → ESCs and FC.
- Double‑check polarity (wrong wires = ).
Step 6: Connect Radio Receiver
- Plug RC receiver into the flight controller.
- Bind with your RC transmitter (pairing process).
Step 7: Add Camera (Optional FPV Setup)
- Mount small FPV camera + VTx.
- Connect to 5V supply.
Step 8: Software Setup
- Connect FC to laptop (via USB).
- Configure in Betaflight/Ardupilot → motor direction, flight modes, PID tuning.
Step 9: Final Assembly
- Attach propellers (CW & CCW on correct motors).
- Secure wires neatly.
- Battery strap + mount.
Step 10: First Flight
- Pick large open area.
- Start in “Stabilize / Angle” mode.
- Hover test → small corrections.
Safety Tips
- Always remove propellers while testing electronics.
- Li‑Po batteries can explode → never overcharge/discharge.
- Fly in open, safe areas (avoid crowds).
- Follow local drone regulations.
FAQs
Q1: How much does a DIY drone cost?
- Basic DIY quadcopter → 100–100–200.
- FPV racing drone → 200–200–400.
- Pro camera drone (DIY) → $500+.
Q2: Can a beginner build one?
Yes — but start with DIY kits (pre‑packaged frames + ESCs + motors).
Q3: How long is the flight time?
10–20 minutes depending on battery + payload.
Conclusion
Building your own DIY Drone teaches:
- Electronics (ESCs, motors).
- Mechanics (frames, balance).
- Coding/tuning (flight controller firmware).
It’s the BEST way for beginners to learn aerodynamics + robotics.
Start with a basic DIY kit, get your drone flying, then upgrade with FPV cameras or GPS for more advanced features.